FiOS “Three-Router” with VyOS and ESXi, Part 5: VyOS Configuration
The next step is to configure both VyOS routers. Before we do, we should ensure that we have a good high-level understanding of what should be happening.
The ultimate goal of this three-router setup is to have our own VyOS router as the gateway to the Internet, while also allowing the Verizon router to continue providing network access for the value-added services like:
- Video-on-Demand to set-top boxes
- On-screen caller ID
- Remote DVR access
- Etc.
The Verizon router does this by setting up its own NAT’d network on the 192.168.1.0/24 range, which the STBs in the house sit on and use to communicate with Verizon’s servers. The VZ router expects and requires the IP it is assigned on its WAN port to be publicly routable on the FiOS ISP network. If it is not, things may or may not work, or they might become unpredictable in their functionality.
The entire point of the secondary router is to provide 1:1 NAT between the home network and the VZ router, so that the VZ router gets assigned the same IP as the primary router that is actually talking to the FiOS ISP network.
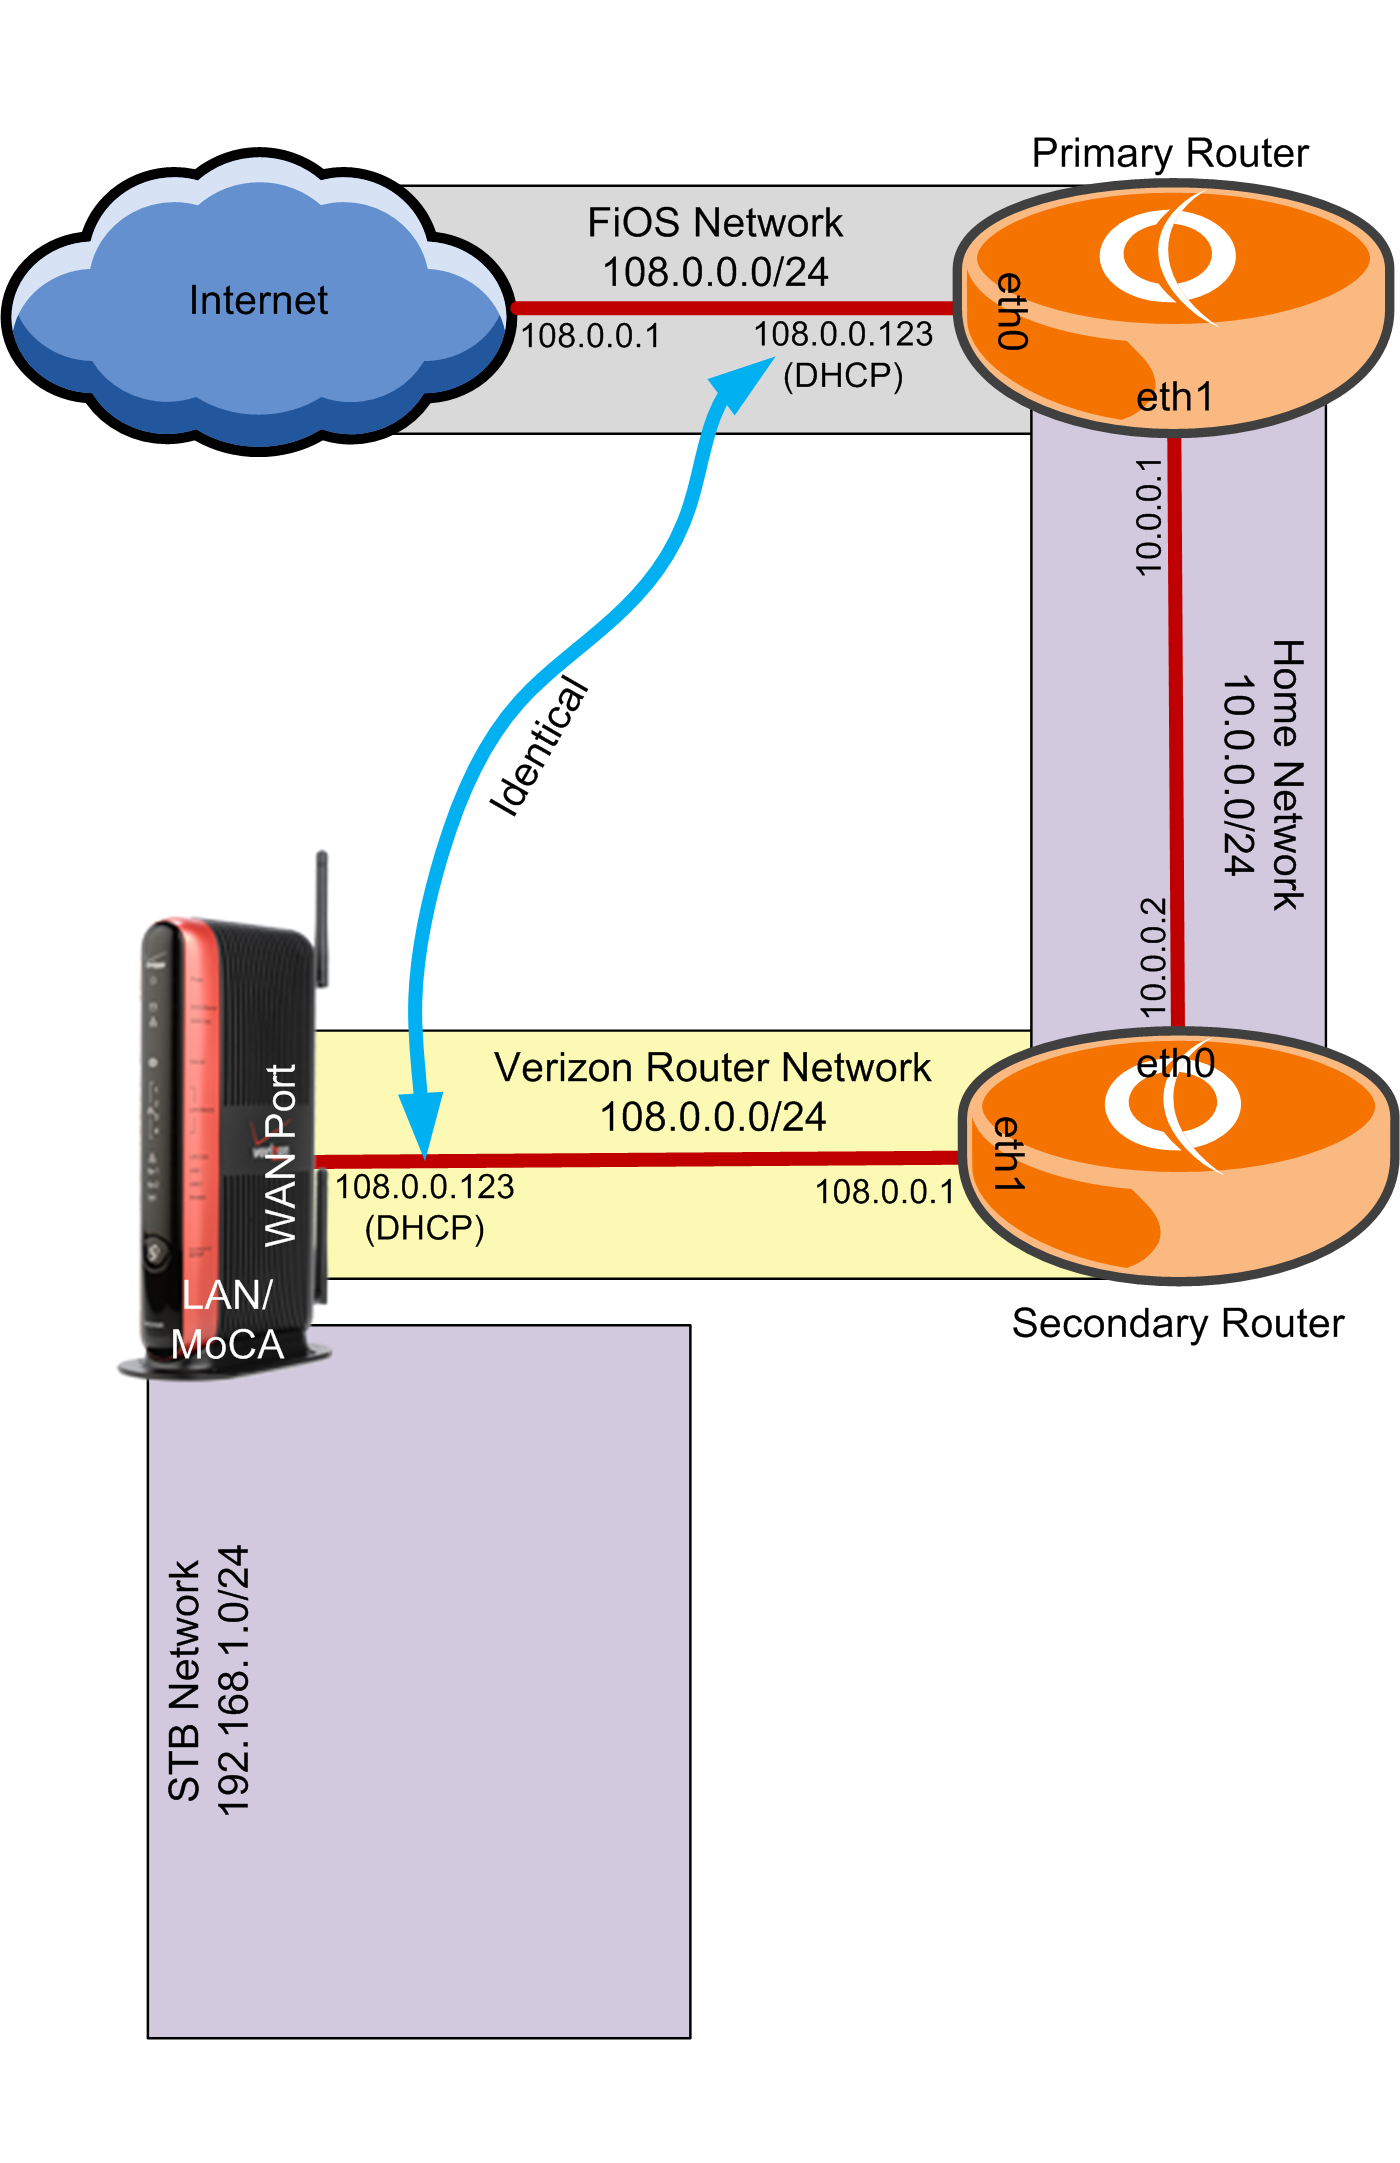
This network configuration, combined with some port forwarding rules on the primary and secondary router (discussed later), allows traffic between the Verizon router and the Verizon servers to flow normally without the VZ router being aware that it is not actually directly connected to the FiOS ISP network.
Let’s start by configuring the primary router. This router will actually receive the public-facing IP from the FiOS ISP network, and thus will ultimately be responsible for all Internet traffic. Log into your primary router and run the show interfaces command.
vyos@primary-router:~$ show interfaces
Codes: S - State, L - Link, u - Up, D - Down, A - Admin Down
Interface        IP Address                        S/L  Description
---------        ----------                        ---  -----------
eth0             108.0.0.123/24                    u/u  FiOS Public Internet
eth1             10.0.0.1/24                       u/u  Home Network
lo               127.0.0.1/8                       u/u
                 ::1/128
We see two Ethernet interfaces, eth0 and eth1. These represent the two vNICs provisioned to this VM, and which correspond to the FiOS Public Network and Home Network port groups, respectively.
Let’s configure the eth0 interface first.
vyos@primary-router:~$ configure
vyos@primary-router:~# set interfaces ethernet eth0 address dhcp
vyos@primary-router:~# set interfaces ethernet eth0 description FiOS_ISP_Net
vyos@primary-router:~# set interfaces ethernet eth0 duplex auto
vyos@primary-router:~# set interfaces ethernet eth0 speed auto
This will set this interface up to use a dynamically assigned address (from Verizon), set a description to make it easy to remember what it connects to, and auto negotiate speed and duplex settings.
There is one more step required. We must configure this interface to impersonate our Verizon hardware router’s WAN interface by setting it to use the same MAC address (Verizon filters MACs that are not on its whitelist). You can find the WAN MAC you need to enter printed on the bottom of your Verizon router. Replace 0a:1b:2c:3d:4e:5f below as appropriate:
vyos@primary-router:~# set interfaces ethernet eth0 mac 0a:1b:2c:3d:4e:5f
Let’s take a look at the changes we are making.
vyos@primary-router:~# compare
When you are satisfied, commit the changes to the running configuration and save the running config to disk. If you commit but do not save, the changes will not persist after a reboot of the router.
vyos@primary-router:~# commit
vyos@primary-router:~# save
Let’s take another look at the interface configuration now. We’re still in configuration mode (note the # symbol at the end of the command prompt), so we need to prepend run to the command we used before.
vyos@primary-router:~# run show interfaces
Hopefully, your eth0 interface has a public address assigned from the Verizon DHCP server. If not, check your connections and configurations.
Assuming all is well, you should now be able to ping addresses to confirm that you have connectivity out to the Internet.
vyos@primary-router:~# run ping 8.8.8.8
PING 8.8.8.8 (8.8.8.8) 56(84) bytes of data.
64 bytes from 8.8.8.8: icmp_req=1 ttl=251 time=21.1 ms
64 bytes from 8.8.8.8: icmp_req=2 ttl=251 time=22.0 ms
64 bytes from 8.8.8.8: icmp_req=3 ttl=251 time=20.9 ms
64 bytes from 8.8.8.8: icmp_req=4 ttl=251 time=22.3 ms
^C
--- 8.8.8.8 ping statistics ---
4 packets transmitted, 4 received, 0% packet loss, time 3004ms
rtt min/avg/max/mdev = 20.948/21.610/22.307/0.605 ms
If this works, then congratulations! The good news is that your first router is working. The bad news is that nothing else can use your Internet connection yet.